
Garmin GFC 700 Autopilot and Flight Director
High Performance Aviation
Garmin G1000 Training Archive
Garmin GFC 700 Autopilot and Flight Director
The Garmin GFC 700 combines an attitude-based digital autopilot with the G1000 flight director. This lesson introduces the system components, mode annunciations, and a basic VFR workflow.
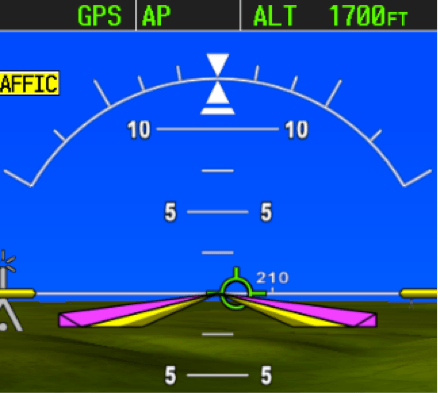
Equipment context: This lesson uses the GFC 700 configuration installed in the Cessna Nav III.
Components and Definitions
AFCS – Autopilot Flight Control System (specifically, the Garmin Flight Control System – GFC 700)
Flight Director (FD) – Provides the following:
- Command Bars showing pitch/roll guidance
- Pitch/roll mode selection and processing
- Autopilot communication
Autopilot (AP) – Autopilot operation occurs within the pitch, roll and pitch trim servo and provides servo monitoring and automatic flight control in response to flight director steering commands, AHRS attitude and rate information, and airspeed.
Manual Electric Trim (MET) – The pitch trim adapter provides manual electric trim capability when the autopilot is not engaged.
Using the Flight Director
To begin, let me state that
The flight director is NOT the autopilot.
The flight director simply serves to provide instructions to the autopilot, or to the pilot (depending on the mode selection). Many professional pilots use the flight director for nearly all of their flying, so they can continue receiving guidance even when hand-flying the aircraft.
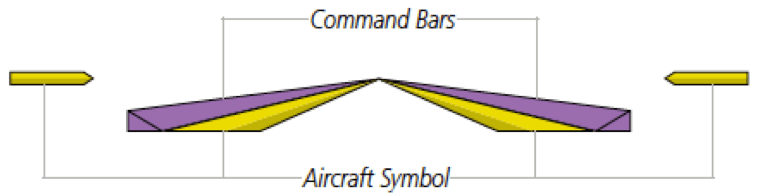
The yellow aircraft symbol represents the attitude of the aircraft. The magenta command bars represent the guidance from the flight director. While flying with the flight director, you simply match the top of the aircraft symbol to the bottom of the command bars. The modes you select will control what the command bars display. You can select a specific pitch, airspeed, heading, course, or altitude if desired. Without a flight director, you would focus on scanning the instrument: looking at the attitude indicator, altimeter, VSI, airspeed, and heading. Now, it is as if the flight director does the scanning for you.
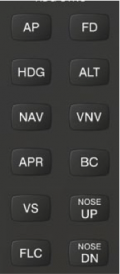
The FD key allows you to turn the flight director on or off. When the flight director is initially turned on, it defaults to the Roll (ROL) & Pitch (PIT) modes. This means that it will direct you to continue holding the same bank and pitch as when you first pressed the key. Then you will continue selecting the desired modes.
System relationship: The flight director may be used without the autopilot, but the autopilot may not be used without the flight director. If desired, the autopilot can be selected first (AP) and the flight director will appear automatically in the default modes. The following example may be used with just the flight director if you want to hand-fly the commands… OR… Let the autopilot do the work and you can watch the results in action.
Mode awareness: Always confirm who is flying—the pilot or the autopilot. The small AP indication at the top center of the PFD provides the answer.
- Green AP = Autopilot is following the flight director commands
- If the center of the status bar is blank or shows a yellow or red AP, then the autopilot is not flying the plane, so you have the controls (or at least you should!).

Typical VFR Flight Example
Preflight preparation
- Autopilot preflight test completed
- Select desired altitude (ALT knob)
- Sync heading bug when aligned with runway (press HDG knob)
- Confirm the minimum altitude for autopilot use in the approved aircraft documentation; it varies by installation and phase of flight.
After-takeoff flow
- FD or AP on (defaults to pitch and roll modes)
- Sync heading bug or select desired heading
- HDG – FD follows the heading bug
- NAV – This will arm the NAV mode to capture the course assuming I’ve chosen an acceptable intercept angle with my heading bug for my desired course. NOTE: This does not automatically pick an intercept angle for the course – You must set the initial intercept angle and then it will capture the course when the CDI needle centers.
- FLC (or VS) - Holds indicated airspeed or vertical speed, respectively.
- NOSE UP or NOSE DN - To select the desired airspeed or vertical speed.
Climb modes
- GPS HDG AP FLC xxKT ALTS

- Once you intercept the course and the course captures, you will see the following:
- GPS AP FLC xxxKT ALTS

- Translation: Tracks your GPS course, while maintaining the indicated airspeed until reaching the selected altitude where it will level off.
Cruise:
The Resulting Cruise Modes:
- GPS AP ALT XXXX FT
- Translation: Maintains GPS course and altitude at XXXX. You will be in this mode for most of the flight.
Descent sequence
- Select Desired Altitude (ALT Knob) – Traffic pattern altitude perhaps?
- Select mode of descent (VS, PIT, VNV, etc.) – VS is typical for descents.
- Adjust the rate of descent – It defaults to the current rate at the moment you select VS, which is probably 0 fpm if you are in level flight. Just press the NOSE DN key 5 times to get 500 fpm.
- The autopilot status bar should now show the following:
- GPS AP VS 500fpm ALTS

- Translation: You will stay on course as you descend at 500 fpm until reaching your selected altitude at which time the FD will capture the selected altitude to cue the level-off.
- Upon reaching the selected altitude, the FD will level off and you will see the following indication:
- GPS AP ALT xxxxFT

- You can now disconnect the autopilot and turn off the flight director as you hand fly your arrival into the traffic pattern.
Best-practice tip: Make it a habit to turn off the flight director anytime you disconnect the autopilot unless you intend to follow it. It’s a bad habit to keep the flight director on if you don’t intend to follow it, as it can prove to be a distraction. It can also create some surprises later if you decide to turn the autopilot back on, not expecting it to try to capture the last selected modes. After pressing the red autopilot disconnect button on your yoke, simply press the “FD” key to turn off the flight director, and the magenta V-bars should disappear.
Original reference: Garmin G1000 Pilot’s Guide for Cessna Nav III, document 190-00498-06 Rev. B.
Would you like more information?
Send us a message below.