
Using VNAV on an Approach (Garmin G1000) Part II
High Performance Aviation
Garmin G1000 Training Archive
Using VNAV on an Approach
This historical lesson follows a complete VNAV and glidepath sequence using an RNAV approach scenario, building on the earlier G1000 descent-planning lessons.
Read first:
Historical scenario: RNAV (GPS) 17 at KWLD
This example begins at 4,000 feet in a G1000-equipped aircraft with a GFC 700 autopilot.
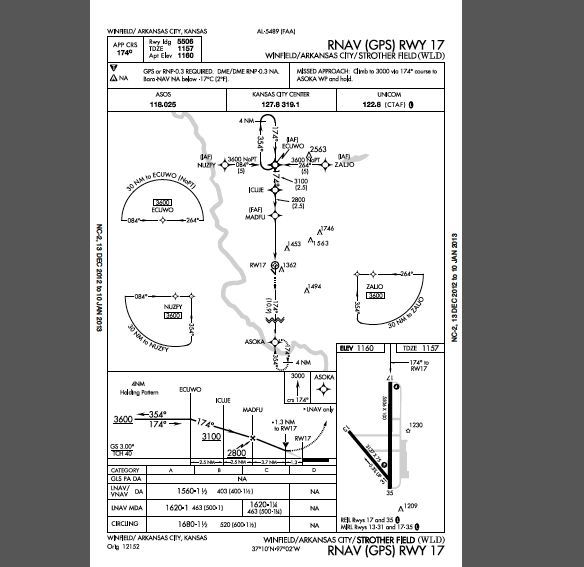
Scenario sequence
- You load the approach via the ZALJO IAF (PROC: Load Approach)
- You get cleared directly to ZALJO, so you activate the approach. (PROC: Activate Approach)
- Autopilot is currently flying in GPS & ALT modes.
- It automatically has ECUWO in the flight plan with an altitude of 3600 ft, and ICUJE at 3100 ft. It happens to show 4,000 ft. in white over ZALJO, because that is the altitude we will happen to cross the fix. (Not a target... Just a reference altitude)
- You always have to make a choice regarding VNAV: Either Use it, Cancel it, or Modify it. Today is our lucky day, and they give you a clearance that allows us to fully use VNAV as it stands. "N12345, Maintain 4,000' until established, you're cleared for the RNAV GPS 17 approach."
- (When you hear the words "Cleared for approach", this is typically the cue to arm the approach using the APR key on the autopilot)
- Arming the approach adds the GP to the autopilot status bar so it is ready when we intercept the glidepath.
- In the meantime you could either manually descend to 3,600 upon reaching ZALJO, or just let the VNAV do the descents for you. In this case, let VNAV do the work. The TOD probably lies somewhere between ECUWO and ZALJO. When you are 1 minute out from the TOD, you hear "Vertical Track". This is our reminder to select the altitude and arm VNAV. Normally we would select the next altitude, but for this specific scenario, you can actually set 3100 (Refer back to item #7 above).
- The autopilot now shows something like "GPS /// AP /// ALT GP/V". Everything is now automated for the rest of the approach. The only step left is to manage power & configuration, enjoy the ride, and disconnect the autopilot and land... But I'll go ahead and walk you through the progression of what happens with the Garmin.
- The autopilot captures the Vertical path at the TOD (annunciated as VPTH on the status bar). While on the VPTH the armed (white) modes would be a condensed version of ALTV & GP. The ALTV indicates that the autopilot will level off at the VNAV BOD altitude of 3600 ft (@ ECUWO) rather than the selected altitude of 3100 ft.
- The autopilot levels at 3600 ft. (probably won't last long because the next TOD is coming up quickly)
- There is no need to re-arm VNV for the next descent to ICUJE. Your altitude bug is already set. VNV is still armed from the last time you pressed it, and it will capture when it reaches the second TOD.
- Autopilot captures the vertical path once again, and continues down to cross ICUJE at 3100 ft.
- Passing ICUJE, VNAV goes away, and the glidepath is now available. As the aircraft intercepts the glidepath, GP captures on the autopilot and the airplane continues down the approach.
- Monitor the vertical mode continuously. After glidepath or glideslope capture, the selected altitude may no longer constrain the descent. Observe minimums, remain prepared to disconnect and fly manually, and follow the approved missed-approach procedure for the specific installation.
Training limitations
Scenario note: The additional ICUJE fix makes this different from many RNAV approaches. It was selected to illustrate several VNAV concepts in one example.
Would you like more information?
Send us a message below.