High Performance Aviation
Expect Vectors to Final, Part II
By Hank Gibson, Gold Seal, CFI, CFII, MEI
We talked last week about the Cirrus recommended procedure for briefing and flying instrument approaches. I hope you’ve had some time to practice some of the techniques presented there. If so, your approaches should look a lot more organized and streamlined! This week, we’re going to discuss what Cirrus recommends as far as using the S-TEC autopilot to fly approaches. I’m going to split the article up into how you would be flying the approach, either receiving vectors or flying directly to an initial approach fix. So, just turn that autopilot on, sit back and get ready to learn! (Note: All information below is taken from the Cirrus Flight Operations Manual for the SR20 and SR22).

Vectors
The autopilot procedure is pretty close to being the same for both non-precision and precision approaches. The exception comes when dealing with the descent on the final approach course (FAC). We’ll visit that a little bit later, though. For now, here’s how to program the autopilot when receiving vectors to the FAC.
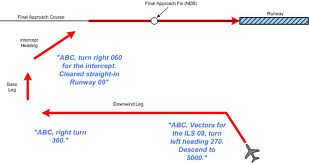
Most of the time, when in a non-training environment (see: out in the real world), most pilots will be given vectors to fly to intercept final. Typically, it is faster to receive vectors then to fly the full procedure (especially on an ILS). Once ATC gives you that first heading to fly, set the heading bug for that heading first, then put the S-TEC autopilot in heading mode (HDG) and keep it in altitude mode (ALT).

Now that the autopilot is on HDG mode, this would be the best time to go ahead and activate the approach on the Garmin 430 GPS. In doing this, it won’t mess up the airplane’s current direction of travel at all unless you change the heading bug. Referencing the above picture, the proper place to arm the NAV and APR modes would be when ATC gives you the heading to turn to in order to intercept the FAC. Also, don’t forget to change the HSI to VLOC on the Garmin 430.
Direct To An Initial Approach Fix (IAF)
The procedure for flying to an initial approach fix (IAF) is pretty simple and straight forward. The first step is to make sure that you have the proper fix loaded in the GPS. Keep the HSI in GPS mode and simply activate the approach. Then, make sure the S-TEC autopilot is in GPS Steer (GPSS) mode and it will fly directly to the fix to start the approach. Keep the autopilot on ALT or vertical speed (VS) and ALT as required.
The tricky portion is if you are doing a procedure turn. If your airplane is WAAS equipped, then you can leave the autopilot on GPSS mode. It will fly the hold following the Garmin 430. If it isn’t WAAS equipped, then you have to keep the autopilot on HDG mode. You will have to keep track of the legs and turn the heading bug to the proper heading at the proper time.
On the Final Approach Course (FAC)
Once you are on the final approach course (FAC) inbound to the final approach fix (FAF), this is when you want to make sure you have the NAV and APR modes active on the autopilot. For a precision approach, set the altitude bug for the DA so you’ll know how low you can go. As far as controlling the altitude, you can simply keep the autopilot in ALT mode and it will pick up the glide slope (GS) by itself. If the GS light is flashing on the autopilot, this means it is not active and has not captured the GS. Disengage the autopilot and try to set it up again. If it still doesn’t work, disconnect the autopilot and hand fly the approach.
On a non-precision approach, you are in charge of telling the airplane when to descend. A 500-800 foot per minute descent would be appropriate unless you have a very strong tailwind. In that case, you may need more like 1,000 fpm. Before you start the descent, set the heading bug for the MDA. Set the autopilot on VS and ALT modes so it will capture the MDA. It is a good practice to set the heading bug a 100 feet or so higher than the MDA so the autopilot won’t go through the altitude.
Once you have determined it is safe to land or it is time to execute the missed approach, disengage the autopilot. The Pilot’s Operating Handbook says you can keep the S-TEC autopilot on no lower than the DA or 100 feet below the MDA. After that, you are required to hand fly the airplane.
S-TEC Autopilot Limitations
There are a few limitations that pilots need to be aware of with the S-TEC autopilot. The first is it’s crosswind ability. There is a 12 knot maximum crosswind component between the FAF and the missed approach point (MAP). Any more than that and the autopilot doesn’t hold the course well at all. If the crosswind is between 12-17 knots, you are required to be at least 10 miles from the FAF when you intercept the FAC.
A few other limitations to mention are, if course deviation is greater than 50%, the autopilot must be disengaged. Flap deflection is limited to 50% with the autopilot. Intercept angles to intercept the FAC are limited to 45 degrees. And finally, when in moderate or severe turbulence, the autopilot must be disengaged. It just doesn’t handle it well.
Hopefully, this will help with your autopilot usage when flying approaches in a Cirrus. We’ve got one more thing to talk about and that is instrument failures in the Avidyne. Come back next week and we’ll discuss those.
Would you like more information?
Send us a message below.

